

Supply List:

1) Something you want to cover, whether it be a journal, chipboard or other fairly rigid surface
2) Foil tape - available from the hardware store
3) Chipboard, dies or die cuts (I used Maya Road Chipboard Mini Butterflies in one of my examples - the green one with the butterflies; in the example above I cut the letters using a die and my BigShot)
4) Adhesive for the chipboard - I used Glossy Accents as it allows me to reposition the chipboard unlike tape-type adhesives
5) Styluses, like those in the McGill Paper Blossoms Tool Kit
6) Black Acrylic Paint, such as Pitch Black Paint Dabber or Claudine Hellmuth Charcoal Black
7) Several coordinating colors of Rub 'N Buff or Inka-Gold
8) Glue N Seal if you are using Inka-Gold
9) Paintbrushes (optional)
10) If using a Smash book - Acrylic paint for the spine of the book (optional), though you can leave it as is or cover with foil like the rest of the book)

A Smash Book makes the perfect base for this project as it already has debossed images on the front cover, however you can also start with a plain chipboard cover and build up texture and dimension using diecuts and chipboard elements, as I do on the plain backs of my Smash Books.

(I apologize, I am going to jump between different Smash Books for the tutorial as I had several in various stages of completion and each has a different pattern on the cover).
Part 1: Foiling The Cover
Step 1
Affix any chipboard or diecut elements you are going to use to your base using Glossy Accents.

You can see a glob of glue under the bottom butterfly from where I repositioned it. Just blot it up the excess while wet and leave it to dry - you won't be able to tell after you've added the foil and paint.
Step 2
Cut strips of foil tape slightly longer than your journal cover.

Remove the backing of the first strip and adhere to your cover. I laid the strips down one at a time so that I could ensure proper coverage once I'd worked the foil around the 3D elements.
Step 3
Use your stylus to push the foil into the recessed areas of your 3D elements. I used a larger stylus for bigger areas, such as inside the butterfly wings and around the base of the butterflies, and a smaller stylus for the more detailed areas, such as the debossed flowers. Work gently around bulkier items to prevent the foil from tearing. (I had a couple small tears at the base of some of the butterflies, but the paint covers these up).

Lay down your next layer, overlapping your foil strips slightly to avoid having any of the cover peek through.
Here is the finished foil layer. The stylus will leave little scratches in the foil, but these add to the distressed look. If you prefer a nearly smooth application, you can use a paper nub to work around your details instead of a stylus.
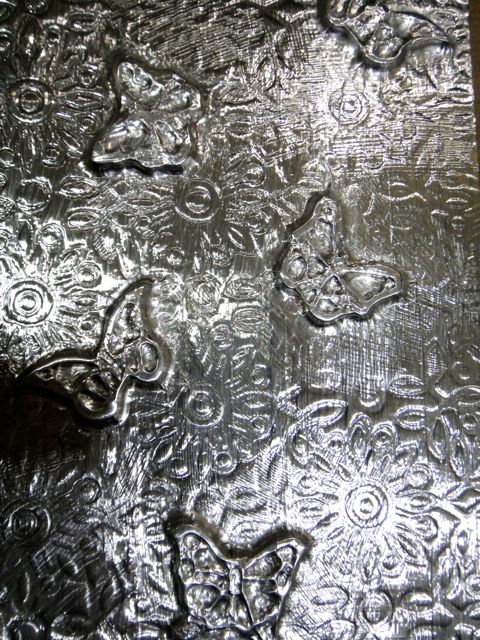
The look of the foil on its own without painting is beautiful, and you might decide you like it so much you don't want to go any further. Here are some examples:


The gears on the back cover are from the Tim Holtz Gears die.
Part 2: Painting The Cover
Step 1:
Decide what type of paint you would like to use.

Here is a test strip of foil - you can see how the Inka-Gold will work on either the painted or unpainted foil, but you achieve much more depth and texture over the painted foil, and the glimmer of the Inka-Gold really shows through. The Rub 'N Buff works best on the painted foil; it is transparent over unpainted areas, allowing the foil to show through.
I will show you completed examples of all 3 methods (Rub 'N Buff, Inka-Gold over unpainted foil and Inka-Gold over painted foil); starting with Rub 'N Buff.
Step 2:
If you are going to use black paint as a base, paint it on liberally. You want the first part you painted on to still be wet when you finish the application.

Step 3:
When the paint is somewhat dry but still tacky, blot off, revealing some of the foil. The debossed areas will retain more paint than the rest of the foil.

Here is what it looks like after blotting:

Step 4: Rub 'N Buff
Choose what color of Rub 'N Buff to use for your base and squeeze some out onto your craft mat. I used Ruby to give it a rusted look.

Using your finger, apply to your cover, allowing some of the black to show through. Because this is your bottom color, you want to be generous; much of the color will get covered up by subsequent layers. Once you apply it to the cover spread it around quickly as it sets within a short period of time.

Step 5:
Add subsequent layers of color. Rub N Buff is great because you can layer different colors without worrying about them muddying each other. Once one layer is on it is set, and you can apply lighter or darker shades over top of it.
I applied Patina next.

Then finished off with Silver Leaf.

You can then embellish further if desired. Because I want the covers of my journal to lay flat when I am using it I chose to leave it as is, though I will likely paint the binding a more muted color.
Inka-Gold Over Foil:
Inka-Gold is my go-to paint for Off The Page products, and I was so excited when the Fling Unicorn Store started stocking it.
For this cover I applied the Inka-Gold directly over the foil. You can see that there is much less contrast and definition.

I applied Gold all over with my finger first, then mixed a little bit of water with Green-Yellow and painted that on. Because I hadn't mixed the Gold with water the highlights are visible despite using watered-down Green-Yellow over top. I then painted the flowers with Violet and then hit the raised portions of the flowers and the butterflies with Steel Blue and Copper.
Because Inka-Gold is water soluble, it is a good idea to cover it with a thin coat of Glue and Seal if you are using it on a project that will be handled a lot, such as a journal cover.
Here is a similar project I completed using Inka-Gold over black acrylic. You can see how much more depth you get.

Painted foil can be fun in smaller applications, as well. For instance, how incredible would a chipboard wire dress form look covered in foil and painted for a steampunk layout?
Foil can also be embossed and then applied to a project and painted, as I have done on these papier mache letters from the October Flying Unicorn Kit of the Month.

And don't forget that Alcohol Inks and alcohol markers such as Spectrum Noir can also be used on foil and other metal embellishments!
I hope that you enjoyed this instalment of Flying Unicorn's What Can You Do Wednesday and that you will be inspired to play with some foil tape.
1 comment:
wow those are awesome!!!!! LOVE :)
Post a Comment