Friday, January 20, 2017

My Creative Scrapbook Sketch Challenge

Do you love sketches? I do - they are a perfect jumping off point for creativity. My Creative Scrapbook has a new sketch challenge up over at My Creative Sketches, and I played along using the January Limited Edition kit.


Here is the sketch:


I had a lot of fun on the background for this layout, so much so that I used a lot of the same techniques when putting together my tutorial layout this month.

I started by doodling through the Crafter's Workshop stencil with watercolour pencils, then used some gold mist as the liquid to blend them in (you can see the sparkle on the rings in the photo above). To give my stencilling crisper edges, I traced loosely around it with a black journaling pencil. This helps the stencilling to not look like an amorphous blob in the background and helps to tie it in with the stamped stitched circles I added next.


I outlined my banner pieces with a gold leafing pen, which helped give them definition but also integrated them with the background paper because of the shimmer. I trimmed some of the chipboard pieces from the kit, and layered those under the banners and also at the sides of the layout to ground the clusters I wanted to build there.


I then splattered the background with first orange mist and then the blue mist included in the kit, coating the still-wet droplets with clear embossing enamel and heat setting it before adding the next colour. I love the dimension the embossing enamel adds; instead of the drops looking two dimensional and getting lost in the background, they look like wet droplets.

Be sure to check out the My Creative Sketches blog for more inspiration. The challenge runs through February 14th, and there is a gorgeous prize up for grabs for one lucky participant. And if you haven't already, be sure to check out the My Creative Scrapbook store to see all four beautiful January kits. 


Tuesday, January 17, 2017

My Creative Scrapbook LE Kit - January Tutorial

Hi there! It's my turn on the My Creative Scrapbook blog today to share a step-by-step tutorial for completing this mixed media layout. If you aren't following the MCS blog, you're missing out on tons of inspiration and tutorials. Be sure to check it out and follow!


Start by tearing a strip out of the centre of the C'est La Vie paper.


Adhere the Oui Oui paper behind it.


Adhere scraps from other projects (mine are scraps from the second sheets of Oui Oui and C'est La Vie). I adhere the centres of the scraps, but leave the edges loose.


I print many of my photos in 4x6, only to later decide that I want them to be a different dimension. By printing them with a border, I can trim them down later and adhere the border back on for a smaller print that still looks finished.


Trim the centre piece to the proper dimensions.


Adhere the two edge pieces under the middle piece without trimming them any further, and voila, you have a smaller print with finished edges, and no one will notice that you pared it down.


Next, add some stencilling through the Crafters Workshop stencil. I painted in the circles and splatters with mist and a fine paintbrush.


Don't worry if it isn't perfect - you are going to add tons of layers on top of it. Add in some splatters.


Trace around the dried stencilling with a black journaling pen.


Repeat with another colour of mist, and trace around that as well once it is dry.


Add some mesh stencilling using the same stencil in another colour. I used pink to tie the pink in the centre of the layout to the rest of the layout. I didn't have any pink paint, so I mixed mica powder with gel medium to make my own paint.


Layer on pieces of the tear strips from the bottom of the sheets in the collection.


Add stamping. I used a round stich stamp set to complement the stencilled circles.


Add in some more splatters of mist (I used the teal Color Bloom spray from the kit along with a pink mist from my stash).


While the mist is still wet, sprinkle with clear embossing powder and heat set for a wet look and some added texture.


Adhere chipboard pieces from the kit.


To make the flowers go farther, and to prevent all of your flowers from looking the same, tear some of the flowers apart into layers.


Cut the bottom layer apart, and adhere the layers on top of one another for a more dimensional flower.


Add the dark resin Prima frame from the kit, and adhere your flowers around where your photo will be.


Position your photo (but don't adhere it yet), and add extra layers of paper and chipboard at the bottom, and finish it off with a flower.


Cut one of the dark Cartographer flowers in half and add to the top left and bottom right of the photo.


Don't be afraid to customize your embellishments to fit your layout.


The medallion from the kit is easily transformed by folding the ribbons under and adhering one of the druzzy stone brads (I cut off the metal fasteners and hot glued it on).


Add your medallion and other brads to the background.


Adhere sequins from the kit to the background.


I use Gel Medium to secure them as it dries clear (pictured here wet).


Add splatters of white paint to the background. This is why I didn't adhere the photo earlier - I find it easier to splatter without having to worry about getting paint on my photo.


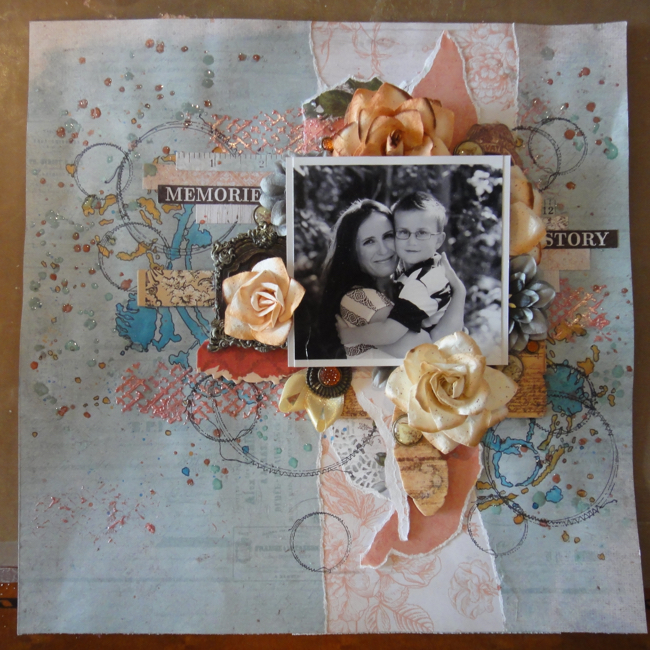
And the completed project:


If you haven't picked up your January kit yet, be sure to check out the My Creative Scrapbook store.

Thanks for stopping by today!  

Monday, January 9, 2017

Brothers *** My Creative Scrapbook LE Kit ***

Hello Bloggers! I'm back today to share another layout made with the January My Creative Scrapbook Limited Edition kit.

We struggle every year to get a nice photo of our boys on the dike following breakfast with Santa, with varied results. This is the best that we got this year, and though it isn't perfect, I love the little bit of attitude the boys are throwing our way.


I added a bunch of media to the backgroud, including modelling paste, sprays, stamping, watercolours, doodling and coloured pencils.


In addition to the gorgeous chipboard, druzzy stone brads, metal accents and flower vines in the kit, the trims are amazing, and I chose to highlight them on my layout by layering them as a horizontal strip and building the layout around them.


Thanks for stopping by today! If you haven't already, be sure to pick up your kit in the My Creative Scrapbook store, and be sure to follow the blog for tons of inspiration from the Design Team all month long.

Thursday, January 5, 2017

Treasured Memories *** My Creative Scrapbook LE Kit Reveal ***

It's time for another stunning kit release from My Creative Scrapbook. I'm thrilled to announce that after 6 months as a Guest Designer, I've been invited to stay on as a Design Team member! This month's Limited Edition kit is packed full of Kaisercraft's Ooh La La collection, along with gorgeous Prima flowers, chipboard, alphas an embellishments.

Along with some stunning pink-hued papers, the Ooh La La collection boasts some great neutral papers, some of which I've combined on my first layout, below.


I started by tearing a couple peek-a-boo spots out of the window paper, then blended the seams of the two papers using white gesso to soften the transition, along with stamping in black ink with script and bubblewrap stamps.


The papers in this collection also had some great pieces for fussy cutting, which I layered as a base for my photo. I inked the edges with grey chalk ink for a little added definition. I added some blue seed beads beneath the paper layers with gel medium.


I coloured the lace trim from the kit with the Soft Teal Color Bloom spray included in the kit, and looped it, along with some gauze coloured with Tea Stain spray, behind my photo for texture, and layered on some of the gorgeous Prima Cartographer flowers and Butterfly brads.


For my title, I cut up one of the tear strips (the sayings on them are great in this collection!).

Here's a photo of the January Limited Edition kit:


If you haven't had a chance to check out all four of My Creative Scrapbook's January kits, you can check them out in the store, and be sure to follow the blog all month for inspiration and tutorials from the Design Team.