Wednesday, October 30, 2013

Flying Unicorn Gives Back Charity Blog Hop & A Layout

Welcome to the Flying Unicorn blog hop! We have a great prize up for grabs this weekend! You should have arrived here from Jennifer's blog. If not, head on back to the Flying Unicorn blog to start the hop - you'll want to visit everyone's blog for some fantastic inspiration and your chance to win.


Every November, Flying Unicorn sponsors "Flying Unicorn Gives Back." This year, we've chosen to support a nationally recognized charity, Best Friends Animal Society in Kanab, Utah.

There are several ways we can make a difference:

- For each project that is uploaded to our forum gallery, Flying Unicorn donates $1.00 to a maximum of $1,000 and we've always reached our goal. With your help this year we will again! 
- Flying Unicorn will donate 5% of all sales during the month of November to the charity. 
- Finally, do not forget to mark your calendars for our Silent Auction November 8th - November 16th .- We have also set up the Flying Unicorn page on the Best Friends site where monetary donations can be made to help us reach this years goal of $3000.00 in charitable donations.


Best Friends' mission of No More Homeless Pets tries to place dogs and cats who are considered "unadoptable" into good homes, and to reduce the number of unwanted pets through effective spay and neuter programs. Since its inception, the number of dogs and cats being destroyed in shelters has fallen to approximately 5 million a year. There has been much progress,but there is still much more to do. Best Friends made national headlines with
 their intensive efforts in rescuing so many animals in the aftermath of hurricane Katrina.


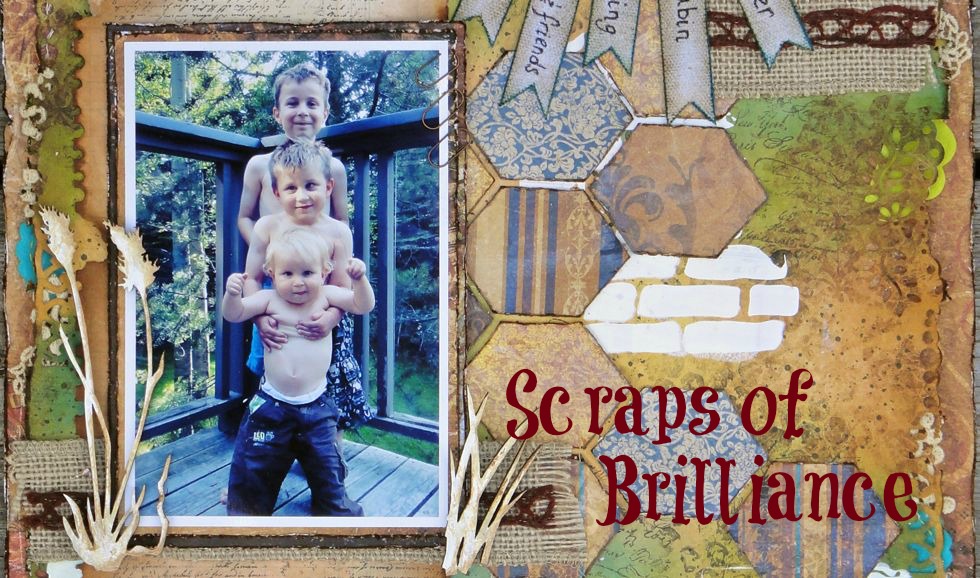
In honor of Best Friends, and the November Kit of the Month - Heart's Twilight - I would like to share with you the extra special project I made using the Kit of the month and featuring my canine best friend, Ryder:

I based my layout on Prima's October BAP, using the Prima Delight papers included in the Heart's Twilight kit.


A couple closeups:


 Supplies:


- Prima Delight papers: Destinations and Delightful
- Shimmerz Spritz: Cotton Candy and Bed of Roses
- Prima Delight tags
- Prima Delight tickets
- Prima Perdu flower
- Prima Delight Mini Roses

From my stash:

- Prima Chalk Ink: Tin Can and Dark Rust
- Prima Script Stamp
- Shimmerz Vibez: Jeni B Bleu
- Prima Diving alphas
- Prima Lifetime alphas
- Prima Resin Bird

And here is the awesome sketch it is based on:


Heart's Twilight is now available with an amazing and fun off the page creation - take a look:


Do not forget to join Alda and Shona this month with their process of making the below layouts. Alda will show you step by step on our You Tube Channel, while Shona has done a complete Build a Pagefor you all! 


We have a wonderful prize up for grabs to one lucky hopper.


Imagine what awesome new goodies you could get with that prize.  Here's what you have to do to be in the draw:

01. VISIT EACH BLOG ON THE HOP, BECOME A FOLLOWER IF YOU AREN'T ALREADY, AND LEAVE A COMMENT
02. ONCE YOU'VE FINISHED THE HOP, LEAVE A COMMENT IN THE HOP SECTION OF THE FLYING UNICORN FORUMS TELLING US WHAT YOU ENJOYED ABOUT THE HOP
03. WINNER WILL BE CHOSEN VIA RANDOM.ORG 6:00PM ON 11.03.2013

WAIT! There is a little more before you hop on over to Angelica's blog.

Want to win a Cameo-Silhouette?


Every $5.00 donated to Best Friends via our donation page will give you a chance to win!
Additional details can be found on our forums.

So hop on over to Angelica's Blog for some additional eye candy fun and thank you for your support in giving back !

Remember This Happiness Always & Forever

Hi there! I'm stopping in tonight to share a layout I made for Blue Fern Studio's October Sketch Challenge using the new Marion Smith Designs papers now available in the Flying Unicorn Store.


I used the Blue Fern Blooming Flourish and a couple of pieces from the Widgetworks for my layout, altering them to fit my earthy layout.


I started by water distressing just the leaves and blooms of the flourish, then peeling them apart into many layers.  A couple layers ended up peeling away from the flourish; I simply adhered these to other places on the flourish for some added dimension. I layered on media to give the leaves and blooms texture, and painted the stem with a mixture of Gelatos, Shimmerz and ink.


I altered the arrow and gears (tucked amongst the clusters) from the Widgetworks using Embossing Enamel, a script stamp and Vintage Photo Distress Embossing Powder.


To tone down the brightness of the Shimmerz Dazzlerz I scattered over some Vintage Photo Distress Embossing Powder and heat set it.


I love these mesh flowers from Petaloo!


 And here is the inspiration sketch from Blue Fern Studios:


 Supplies

- Blue Fern Studios chipboard: Blooming Flourish & Widgetworks
- Gelatos: Chocolate, Butterscotch, Lime, Mango
- Shimmerz Texturez: Artie-Choked
- Shimmerz Dazzlerz: Sour Apple & Lemon Drop
- Shimmerz Coffee
- Marion Smith Nirvana Collection: Cloud 9 & Documented
- Marion Smith Mad Tea Party Collection: Tea Party
- Kaisercraft Stamps: True Romance, Crackle
- Prima Chalk Edger: Dark Rust
- Tim Holtz Vintage Photo Distress Embossing Powder
- Mix'd Media Inx: White Jasmine
- Stampendous Aged Embossing Enamel: Ivory
- Prima Script stamp
- Prima Sherwood Roses: Truffle
- Prima Audrey flowers: Yellow
- Prima Abbey flowers: White
- Tim Holtz Distress Ink: Walnut Stain & Vintage Photo
- Prima alphas
- Viva Decor Pearl Pen: Sunny Yellow

Thank you for stopping by!

Sunday, October 27, 2013

Wonderful Memories

How was your weekend?  We hit the pumpkin patch yesterday and carved pumpkins today, so all in all it was a good weekend.

I'm stopping in tonight to share a layout using Teresa Collins' new Santa's List line, now available at the Flying Unicorn Store. I loved creating with this line, especially with the glitter papers.

This is a picture of Brennan and Colby sitting under the tree Colby's first Christmas.  I was trying to get a posed picture of the 3 boys together and wasn't having any luck, but managed to catch this wonderful candid moment between the two of them.


For my cluster I layered together two different Petaloo vines along with buttons and chipboard embellies from the collection - love those little stars!


Some Dusty Attic chipboard heat embossed with Stampendous Embossing Enamel in Aged Green with the little pop outs from the Santa's List chippies adhered for extra dimension.


Background work and stamping with Gelatos, stencilling, stamping with a Kaisercraft stamp.


Supplies:

- Teresa Collins Santa's List: Ledger, Chevron, Red Flakes, Notecards, Postcard and Decorative Buttons embellies
- Colorbox Chalk Warm Green
- Prima Chalk Edgers: Shabby Tote & Black Coal
- Tim Holtz Star Stencil
- Gelatos - Red Cherry & Pistachio
- Gesso
- Dusty Attic French Flourish Border
- Stampendous Embossing Enamel - Aged Green
- Petaloo Canterbury Rose & Berries Picks Cream
- Petaloo Flora Doodles Paper Flowering Vines Burgundy
- Kaisercraft True Romance Stamps
- Ranger Emboss It Dabber

 Thank you for stopping in! Your visits and comments are so appreciated.

Saturday, October 26, 2013

Leaky Shed Chipboard at the Flying Unicorn

I love chipboard. I am a chipboard junkie. So needless to say, when the Flying Unicorn Store started stocking Leaky Shed Chipboard I was excited. And it does not disappoint in person; I have used up every single piece of my first shipment aside from one little keyhole waiting to be used.

I have two Leaky Shed projects to share today. The first is a layout featuring this cool photo of my niece my sister-in-law took this summer. Kailey is a gregarious young lady, and the "Live, Laugh, Love" chipboard was perfect for a layout featuring her.


I altered my chipboard letters by first coating them in gesso and the applying various colors of Gelatos straight onto the chipboard.  I finished everything off with a Gold Leafing Pen from Krylon.


I used ceramic stucco to add some visual interest to my background, inking my stamp with brown ink before stamping it into the wet media. 


These Prima Bella flowers are amazing - love! One of the great qualities of the artist stucco is that if you apply it in a thin coat you get texture but can still see the images from the paper behind it through the media.


Supplies

Leaky Shed Studio chipboard - Family Tree Word "Live, Laugh, Love"
Faber-Castell Gelatos
Gesso
Krylon Gold Leafing Pen
Prima Fairy Rhymes Papillon paper
Royal Langnickel Watercolor Pencils
Prima Mask
Kaisercraft Crackle stamp
Prima Flowers: Bellas - Pink, Divine - Roses, Divine Paper Flowers
Maya Road Zipper Trim, Grey


For my second project, I was inspired by the chipboard to make a Christmas card using the gorgeous new Teresa Collins line, Santa's List, now available in the Flying Unicorn Store.

I trimmed the middle bar of the birdcage so that when I mounted the keyhole on top the hole would be unobstructed.


I heat embossed the cage itself with Aged Gold Embossing Enamel. A quick tip - if your Aged Embossing Enamel comes out looking too smooth and one-toned, press a silicone stamp into the warm embossing enamel and reheat slightly. This reveals an additional dimension of color.

For the keyhole, I wanted to maintain the fine details etched onto the piece and worried that the chunkier Embossing Enamel would cover them up, so I reached for a finer Ranger embossing powder which let the details shine through.


Did you know you can paint on your liquid embossing fluid to emboss different areas of your chippies with different colors? I simply unscrewed the dabber top and dipped in my paintbrush and voila! I used three embossing enamels on the bird, and for the crown I again used the finer Ranger powder.


 Supplies:

Teresa Collins Santa's List papers: Santa, Postcard, Red Flakes
Leaky Shed Studios Chipboard: Barn Swallow With Crown, Bird Cage, Keyhole Plain
Ranger Emboss It Dabber
Stampendous Embossing Enamels: Aged Gold, Aged Ivory, Aged Black
Prima Chalk Ink: Shabby Tote

I'm absolutely shocked that I've completed a Christmas project already, but it is getting to be that time of year, isn't it?

Thank you for stopping by!!!

Friday, October 18, 2013

Flying Unicorn and Once Upon A Sketch Team Up

Hi there! Just a quick post for me today - this month is flying by.  I really wish I could slow it down, Halloween is coming at the speed of light and I'm not ready!

The Flying Unicorn CT are Guest Designing at Once Upon A ... Sketch this month. It is always a pleasure to play with Nadia's gorgeous sketches. This month's journaling prompt is "Journey", and the October kit of the month from Flying Unicorn had this perfect quote to use as a centerpiece (my journaling is hidden on the back of the layout).


I added lots of texture to the background page. Ceramic stucco through the new 6x6 Prima Rock Wall mask,


Stamping with the Kaisercraft background stamp from the kit,


Stencilling with Shimmerz Texturez in Spun Sugar through the Studio Calico stencil in the kit and stamping with the new Finnabair Elementals Checker stamp.


I love the Jillibean Soup corrugated butterflies from the Embellishment Add-On.


And here is this month's sketch - still plenty of time to play along!


From the Kit and Add-Ons

Kaisercraft Take Note - Noteworthy, scraps of different papers, chipboard stickers
Prima Fabric Flowers
Petaloo Velvet flowers
Adorn It Laser Cuts
Jillibean Soup Corrugated Shapes
Adorn It Laser Cuts
Kaisercraft Texture stamp
Studio Calico stencil

From my stash


Gesso
Ceramic Stucco
Prima 6x6 Path stencil
Prima Finnabair Elementals Checker stamp
Shimmerz Dazzlerez Spun Sugar
Memento Teal ink
Prima Chalk Edgers: Summer Field, Turquoise Stone, Blossom, Dark Rust
Distress Ink - Shaded Lilac, Weathered Wood

Tuesday, October 15, 2013

WCYDW at Flying Unicorn - Make Your Own Silhouettes

Welcome to What Can You Do Wednesday! This week I'm bringing you a short, easy tutorial on how to make your own silhouette masks for your art journaling.

Start by cutting images out of a magazine.


I selected these two images from a Stella Artois ad.  The man had long flowing hair and a protruding ear - I trimmed these off as his silhouette would look like an amorphous blob otherwise.


To give the silhouettes more structure I mounted them onto scrap cardstock. I Mod-Podged overtop of the images to give them a little more resiliency so that I can keep them for later use.  For a one-time-use silhouette you can skip this step.


Once the Mod-Podged is completely dry, cut the silhouettes out and place them where you'd like on your background.


I forgot to photograph the next steps (sorry!, I got caught up in the creative process LOL), but I added some music notes I'd handcut from cardstock and then painted over the lot with black gesso. With my masks still in place, I stamped over the background in white ink.

Using the positive stencil left when i cut out the silhouettes, I masked off the black areas and applied yellow acrylic paint through a Crafter's Workshop stencil to add some additional definition to my silhouettes.


Using a Stabilo Aquarabelle white pencil I outlined the silhouettes to give them more definition.

And here is the completed project:


I hope you'll give this a try. Alternately, if you like the look of silhouettes but do not want to make your own, Crafter's Workshop has a selection of silhouette masks (each pack contains the positive and negative image) which are available in the Flying Unicorn Store.

Supplies:

Gesso: White and Black
Dylusions Sprays: London Blue and Postbox Red
Prima Mask: Poppies and Peonies
Crafter's Workshop: Mini Art Is
Yellow Acrylic Paint
Tim Holtz Tissue Tape: Symphony
Prima Brick stamp
Mix'd Media Inx: Jasmine
Stabilo Aquarellable: White

Monday, October 14, 2013

Mixed Media Challenge at Flying Unicorn Forums

It's my pleasure to host this month's Mixed Media Challenge on the Flying Unicorn Forums.  All your mixed media projects are welcome here - art journal pages, canvases, off-the-page projects and scrapbooking layouts - if it is mixed media in nature, we want to see it!

Though there are no set challenge requirements other than our standard challenge rules, we like to provide you with some inspiration each month.  Here are a couple art journal pages I worked on in a Dina Wakely class to get your creative juices flowing - I love the way she uses silhouettes of people and objects in her work.


Supplies:

- Claudine Hellmuth Acrylics
- Crafter's Workshop Stencils
- Dylusions Spray
- Watercolor Paper
- Sewing thread


Supplies

- Watercolor Paper
- Crafter's Workshop stencil Mini Chickenwire Reversed, Nancy Emily Polly
- Prima 6x6 Raindrops stencil
- Molding Paste
- 13 Arts Water Ink Skye Blue, Yellow
- Faber-Castell PITT Pen - Black

Stay tuned, on Wednesday I will share a quick and easy way to make your own silhouettes for WCYDW.

This challenge runs through November 14th at 8pm EST - enter as often as you'd like here! The best part is, you don't have to buy anything to participate - we're happy to have you use what you have in your stash.

Look at the lovely RAK up for grabs!