Monday, December 31, 2012

Flying Unicorn January KOM - Part 1

Happy New Year, blogosphere friends!

When I opened my January Flying Unicorn kit Carpe Diem I could have squealed with delight.  Jam-packed with goodies, two of the three paper lines (Pink Paislee Portfolio and Basic Grey Serenade) were papers I would have ogled in other people's layouts but would not have had the confidence to pick up for myself.

Here is the first layout I created with the kit:


Kelly has a challenge this month in the Flying Unicorn Forums to scrap about the personality of your subject.  This is my youngest, Colby, who is, as the title implies, Mr. Personality.  He is just a sunny, happy little guy.  I even have a video of him singing to himself as he wakes up!

I started with the Basic Grey Peacock paper as my base and cut a ring of the Fancy Pants - Beatrice paper and layered strips of washi tape from my stash underneath it, then cut strips of the colorful chevron pattern from the Basic Grey Shilling paper (I trimmed in from the edges to make the narrower arrows).


The sweet little bird is from the packaging of the Basic Grey Flags and Banners which I incorporated into my flower cluster.


It is unusual for me to use products from all three paper lines in one layout, however Alda at Flying Unicorn is such a master at putting kits together that I find it easy to marry the various elements together in one layout.


These gorgeous sparkly letters are Pink Paislee Portfolio, as is the "sweet" tag (below) from the ephermera package.  I finished it all off with some Prima Chalk Ink in Black Soot and a gorgeous Kaisercraft flourish from the kit.


 Carpe Diem is on sale now - grab yours before it's too late!

And please join us in the Flying Unicorn Forums, where our January challenges have just launched - as usual there are gorgeous RAKs up for grabs and international entries are always welcome!

Sunday, December 30, 2012

Flying Unicorn Inaugural Art Journal Challenge

We're pleased to bring you a new challenge this month at the Flying Unicorn Forums - Art Journaling.

What exactly is art journaling?  Art journaling is one of the freest forms of papercrafting; it is all about personal expression and experimentation.  There is no right and wrong, so grab any supplies you have on hand - inks, mists, paints, gesso, stencils, markers, pencil crayons, stamps, Gelatos, magazines, scraps of paper, masking tape, canvas - literally anything you have can be used to create in an art journal.  You don't even need a journal (though if you'd like to pick one up we have 4 or 5 arriving in the Flying Unicorn store early next week); pages can easily be cut from cardstock and covers fashioned out of chipboard.

The Creative Team member hosting the challenge will provide an inspiration piece every month; you are welcome to use the mediums and techniques they did or strike out on your own and do something that resonates with you.

Here is the inspiration piece I've prepared for this month.  For me, my art journal is a place to play around, to stamp and color and draw like I haven't been able to when I was a young girl, to introduce some whimsy into my days, and to try new techniques on a smaller and more intimate canvas than a layout.  I saw this amazing technique developed by Vivian Keh using hot glue and Mix'd Media Inx to achieve gorgeous effects.  Though her effects are far more abstract, I instantly thought the 3D effect would be perfect for a tree trunk, and set out to create that on a piece of resist canvas from my Prima Mixed Media Album.


I applied gesso to the background in random places and dried it, then misted the canvas with water followed by various mists in blues and greens. I stamped the upper portion with a background stamp by Prima.  I then applied rumpled masking tape to my background, which I covered with gesso, into which I sprinkled my new Distress Stickles Dry Glitter then dried, before misting it.  I then went to work with my glue gun, creating the ridges and furrows of my tree.  It was a lot of fun to watch it come together!  When the tree was dry I misted it heavily with darker color mists to bring definition to the low points, then applied two layers of pigment ink to the raised areas.


The rules:

- Aside from the standard rules there are very few rules.  Use whatever techniques or mediums appeal to you.
- You can do a one page or two page journal "entry", however a two-pager will only count as one entry if it is a contiguous piece of work.
- Up to 2 entries per person, art journal pages only (you choose the size)
- Projects must be new as of December 30th, 2012. Challenge closes at 8pm EST on January 31st, 2013.
- Winner will be chosen by random.org. Each individual can only win one challenge per month to spread the wealth around. Winner must PM Alda their mailing information within 7 days or forfeit their prize.
- Entries are not eligible for any other challenge on Flying Unicorn.


Here's the RAK that's up for grabs:


I hope you'll play along!  I plan on making a two-page Kate Crane-style calendar page for each month to document the goings-on in our family I don't want to forget - the funny and touching things the kids say and do, the triumphs and the heartbreaks.

Carpe Diem - January KOM from Flying Unicorn


Off the Page Creations


You Tube

Thursday, December 27, 2012

New Year, New Uni

Christmas has barely been put to bed, and yet the gyms already have their new year's resolutions commercials in heavy rotation and I just couldn't resist borrowing from an old gym tag line for my post header.  The new year is about fresh starts and for many of us that includes exercising our bodies after an indulgent holiday season.  At Flying Unicorn we have some exciting changes lined up for you starting in January to help stretch your creative muscles.  And unlike those gyms plastered all over my TV, we still do not require you to sign a pesky contact here at Flying Unicorn.  Purchase the kits or products that appeal to you, pass on the rest.  We're still the same great store, kit of the month club and online community, but for 2013 we're bringing you even more awesomeness.

I can't let you in on all of the changes we have in store - keep checking back for all the details - but I can let you in on one new monthly challenge debuting in January: Art Journaling.

What exactly is art journaling?  Art journaling is one of the freest forms of papercrafting; it is all about personal expression and experimentation.  There is no right and wrong, so grab any supplies you have on hand - inks, mists, paints, gesso, stencils, markers, pencil crayons, stamps, Gelatos, magazines, scraps of paper, masking tape, canvas - literally anything you have can be used to create in an art journal.  You don't even need a journal (though if you'd like to pick one up we have 4 or 5 arriving in the Flying Unicorn store early next week); pages can easily be cut from cardstock and covers fashioned out of chipboard.

The Creative Team member hosting the challenge will provide an inspiration piece every month; you are welcome to use the mediums and techniques they did or strike out on your own and do something that resonates with you.

Here are a couple pages from my various journals to inspire you:

DSC03186

Some masking, drawing and stamping along with luscious Dylusions sprays were used on the page above.  The pocket on the right holds tags that I've used to try out different techniques - I write what I did on the back and any suggestions I have for how to improve the technique the next time.

DSC03187

Dylusions, stamping, doodling, masking with gesso, coloring with Copics.

I'm have another inspiration piece up my sleeve using canvas, making tape and hot glue that will debut with the January Art Journal challenge - I hope you'll join us in the Flying Unicorn Forum and play along!  I can't wait to see what you create!

Flying Unicorn Design Team Call

 
We are on the lookout  again 

Flying Unicorn is an online Papercraft store, Kit of the Month and Manufacturer of embellishments, specializing in paper art and scrapbooking. We are looking for 2-3 dedicated Creative Team Designers to help promote Flying Unicorn. The successful applicants will need to work well with deadlines and always produce projects and photos  of a high standard.
The term will commence as of the February 01, 2013  and run till the 31st  of  January 31, 2014.
Being a part of the Flying Unicorn Team, you will receive:
    • The main  kit of  the  of the  month
    • Monthly products showcasing manufacturer’s that we carry.  
    • RAK’s for  challenges and  blog hops 
    • Discounts and  free shipping  from the Flying Unicorn Store
    • Bragging rights for  being on the fabulous Creative Team at Flying Unicorn
Being on the Flying Unicorn Team you will have the following responsibilities:
·      *   4-6  projects a month.
·         Active and daily participation in our forums is a must.
·        * Be involved in our rotation of special posts, Mojo Monday, Card Challenge, etc.  when you are  rostered on.
·      *  Run a monthly challenge on the forums.
·        * Maintain your personal blog and link to the Flying Unicorn website/blogs
  •  You are encouraged to immediately become an active participant in our challenge threads and other forum topics so that we can get to know you http://www.flyingunicornforums.com
Please forward the following information by the 15th of January 2013  8:00pm EST via email  to cs@flyingunicornllc.com  with  Creative  Team Application as  the  subject  line .  Please include :
- Full name, address, daytime/evening phone number and email address.
- Short biography  of yourself and  a picture. We  will use this if you are  selected.
- Links to your online gallery and blog
- List of any other design teams you have been on or are still with. There is no experience required 
 
We are accepting International Applicants. 
 
The  new  additions  to our  Creative  Team will  be announced by the 2oth of January 2013.
GOOD LUCK!

Saturday, December 22, 2012

Lucky - My Flying Unicorn Store Product Pick

When the Creative Team was given the opportunity to select our own product to feature in December, I took a good while combing the virtual shelves of the Flying Unicorn Store trying to decide which line I wanted to work with.  There were so many fantastic ones to choose from, but time and again when I made my short list Bo Bunny's Serenity line jumped out, like Donkey in Shrek jumping up and down in the crowd calling "Pick me! Pick me!  Ooh, ooh, pick me!"  Serenity is several seasons old, but I have loved it since it first came out - beautiful dark colors, cherry blossoms, AND it shares the name of a great Joss Whedon movie based off on of my all time favorite TV shows, Firefly - but have always passed it over because I didn't feel like it fit with the little boy pictures I usually scrap.  But what's life without a little challenge, right?

Once I started working with the papers the whole layout came together with very little effort, and I love the finished result.

The picture is of Evan, Elliot, Brennan, Colby and myself on the Fraser River earlier this month just before breakfast with Santa - we should use the auto-timer on our camera more often as I think it turned out great!

FUL 12-2012 Product

I knew immediately that I wanted to use the green circle from the reverse side of the Serenity Stripe paper; I cut it into 2 rings and offset them with a wide strip of the Serenity Dot running across the page.  Whenever I receive my Flying Unicorn orders they are lovingly packed with colored tissue paper, and being the crafty hoarder I am I save it.  I ruffled a piece of red tissue paper I had saved and layered it under my strip for some added dimension.

FUL 12-2012 Product 4

I painted the Kaisercraft Branch with Olive Vine Silks paint and punched the little red flowers out of tissue paper (Hint: to punch through tissue paper, which will tear or not punch completely through because it is so thin, layer a piece of scrap cardstock underneath it and then punch it). To add some weight to the flowers and to give them shape I painted them with Gloss Multi Medium and used Liquid Pearls in White Opal for the centers (and elsewhere throughout the layout).

FUL 12-2012 Product 2

I painted the Dusty Attic Sweet Pea Border (currently out of stock, but look for a massive restock of Dusty Attic in the store soon - it has shipped from DA in Australia) with Olive Vine Silks and Tattered Angels Glimmer Glam in Be Positive, which I also used to customize the color of my alphas to fit the layout.

FUL 12-2012 Product 1
The large red flower is Prima from my stash, while the smaller white flowers are Flying Unicorn and the small black ones are Kaisercraft.

FUL 12-2012 Product 3
And you remember that I mentioned FIrefly was one of my favorite shows?  I couldn't resist adding this metal firefly from my stash to the layout.  I colored it with red and green Copic markers so that it would coordinate with my papers.

Additional supplies:

Sew Easy Floss - Grey
Tsukineko Ancient Dynasty Coins (from my stash)

I hope you are all finding some time for scrappy therapy during this incredibly busy season.

Have a very Merry Christmas!

Sunday, December 9, 2012

Cork - It's Not Just for Wine Anymore! *** Flying Unicorn KOM ***

In addition to the Off-The-Page project that comes included in every kit, Flying Unicorn is known for adding in other great elements to get scrapbookers to think outside the box.  This month the main kit includes a 12X12 piece of cork and a sheet of transparencies to take your creativity in new directions.
I'm hosting the Kit of the Month Challenge this month, and I want to see what you can do with cork. 

To get your creative juices flowing, I've prepared a couple of projects for you using cork in different ways.

The first thing that occurred to me when I saw the piece of cork was wondering if I could use my Big Shot to make stamps with it using my favourite dies.

I started by trimming a piece of cork to my desired size, 3" X3".  The cork cuts really easily using a cutting mat, craft knife and metal edged ruler (I used the Tim Holtz ruler).

FUL 12-2012 Today 1

I placed the piece of cork on my Tim Holtz Alterations Gadget Gears die and rolled it through the machine (it takes a little bit of muscle to get it rolling).

FUL 12-2012 Today 2

FUL 12-2012 Today 3

Depending on the die, you may be able to roll the cork through between two cutting pads, but for some dies I had to use one cutting pad and two shims made of chipboard.  In this case the die only cuts the cork partway, however it is easy to follow the lines and cut the rest of the way through with a craft knife. 

FUL 12-2012 Today 5

(NOTE: for my first try, pictured, I didn't cut through the cork but trimmed it away - I DO NOT recommend this as I cut myself pretty badly with my craft knife twice in the process.  Cutting straight through the cork as in subsequent pictures is a much better way to do things.) 

In my first layout, I used my cork stamp with brown chalk ink to stamp the gears under my layers.

FUL 12-2012 KOM 3

I also used some cork as accents beneath my Autumn Leaves Scrap Metal stars.  The cork adds a nice rustic feel while also adding dimension.

 FUL 12-2012 KOM 3-2

The Maya Road chipboard letters from the kit are heat embossed with Stampendous Aged Embossing Enamel in Aqua to coordinate with the rest of the layout.

I don't own a Christmas tree die or stamp (the horror!) and wondered if I could make myself a cork stamp using a cookie cutter.  I applied black ink to the blunted edge of the cookie cutter and used it to make an impression on the cork, then fussy cut it out with my craft knife.

FUL 12-2012 Today 7

FUL 12-2012 Today 6

I then painted it liberally with molding paste and stamped it on a tag I'd misted with Dylusions sprays.  An unforseen bonus was that it left behind these amazing textured ripples.

FUL 12-2012 Today 8

I painted on some green Lindy's mist, added some texture and the "Merry Ho Ho" with a Dylusions mask and a star and garland with some Platinum Stickles.

FUL 12-2012 Today 9

And the finished tag:

FUL 12-2012 Today 10

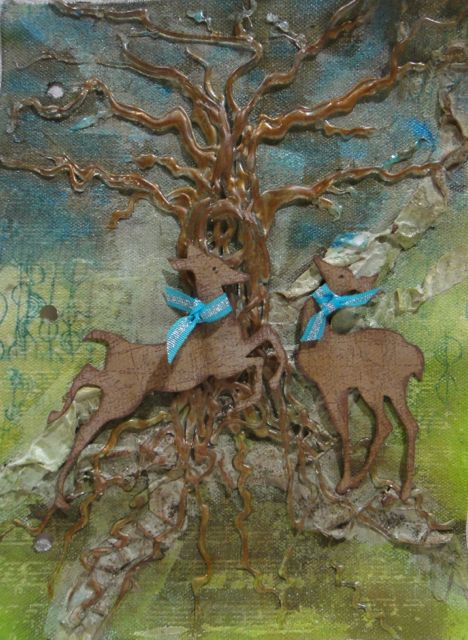
For my third project, I used my Big Shot and Tim Holtz Alterations Reindeer Flight die to cut a reindeer into the cork, then finished the cut with my craft knife. Because the legs are so delicate I also die cut the deer in cardstock and mounted it behind the cork to give it structure. 

For the background on this tag I used Distress Stains in Broken China, Bundled Sage and Brushed Pewter.  I had sprayed through my Crafter's Workshop Mini Flurries mask for another tag, and placed it sprayed side down on this tag to make a negative impression.  I used my Dylusions mask for the border and "Believe" and embellished with a punched snowflake and some Diamond Stickles.

FUL 12-2012 KOM Cork 1

And as an added bonus, you can save your off-cut pieces to use to add dimension to your project in lieu of foam tape. Simply apply adhesive to each side, slip it between your layers and presto, you've got lift!

FUL 12-2012 Today 4

Join us for the Kit of the Month Challenge in the Flying Unicorn Forums, running from December 10th until January 9th, and show us what you can do with cork!

If you haven't had a chance to pick one up yet, I believe there are still a limited number of December kits available for purchase in the Flying Unicorn Store.  Be sure to pick yours up while you can!

Thursday, December 6, 2012

Holiday Treats Recipe Book *** Flying Unicorn KOM ***

Each month's Kit of the Month at Flying Unicorn features an Off-The-Page project.  This month's is a Teresa Collins Christmas Countdown album.  I thought I came up with a unique idea when I decided to make mine into a recipe book, but at least 2 other CT members thought of the same thing.  Oh well!

Here's the cover:


I used Graphic 45 Papers from Christmas Emporium, Christmas Past and Nutcracker Sweet for my cover from the Flying Unicorn store.


I made this flower using the Poinsettia Spellbinders die and used American Crafts Micro Beads in Gold for the center.  The petals are edged in Platinum Stickles for added shine.


The Maya Road Chipboard Alphas are included in the Main Kit.  I heat embossed mine with Stampendous Aged Embossing Enamel in Ivory - I cannot get enough of this stuff!

And here are two interior pages. We recently had a cookie party at my friend Kirsten's house, 4 moms with a total of 10 kids under 7.  I had intended to use pictures of the kids and their friends cutting, baking and decorating cookies, but when we showed up to find Kirsten doing a Stepford wife impersonation I couldn't resist.


The digital stamps from Mo's Digital Pencil were perfect for this layout!  I colored them with Copics and adhered them below my hand-written recipe.


The memory album contains lots of tags and die cuts for layering and embellishing.  I also added a banner of G45 scraps and some jute cord to finish the whole thing off.

Thanks for stopping by!