Saturday, June 29, 2013


Friday, June 28, 2013
Only 3 More Days Of Google Reader
Just a reminder that as of July 1st Google Reader will be no more :( If you currently use Google Reader to keep abreast of the blogs you follow, consider signing up with Bloglovin'. There is an easy way to transfer all of the blogs you currently follow on Google Reader into Bloglovin' - it takes less than 3 minutes to do.
Thursday, June 27, 2013
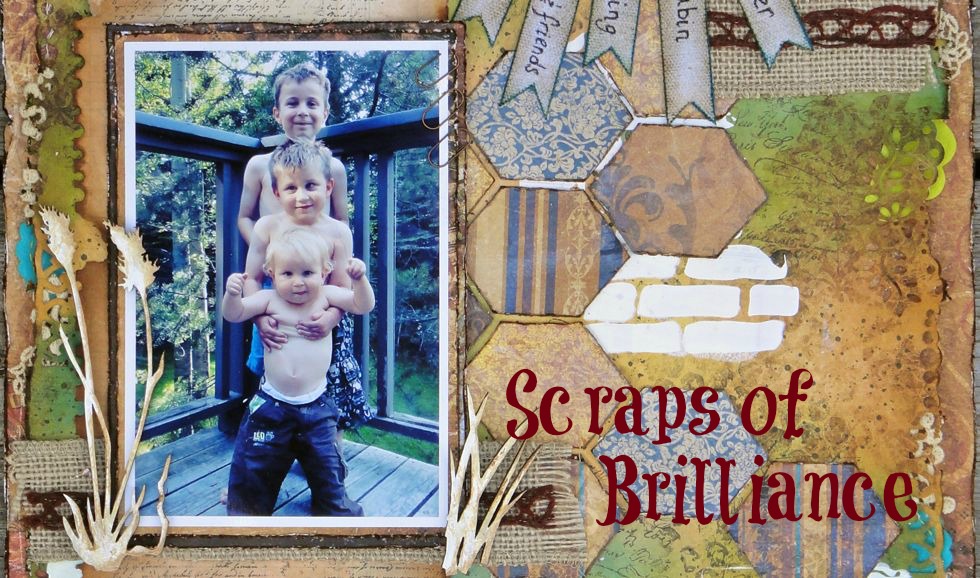
Getting Your Masks To Do Double Duty
Have you ever bought a mask, only to discover once it arrives that it is actually the opposite of what you were expecting - that the parts you expected to be cut out are solid, and vice versa and so it languishes in your stash? Do you have other masks you love, but that you look at and wish that you had an inverse mask as well? For me it's the Crafter's Workshop Mini Brick Wall mask - sometimes I want solid bricks, and am in luck, but other times I wish I could just mask out mortar lines.
I had the pleasure of attending several workshops with Dina Wakely last weekend, and she shared an inspired technique she uses in her art journaling to get the most out of her masks. I couldn't wait to try it on a layout!
I love this mask from the Crafter's Workshop, but I haven't been able to figure out how to use it on a layout - until now.

Start by priming your paper with Gesso. You just need a thin layer - I scraped mine on with a card. Let it dry.

Trace the edge of your stencil so you know how far to paint.

You can use any acrylic paint - I chose to use one of my new Distress Paints - I love how fluid they are. I poured it out and painted it on with a paintbrush.

You want to lay this layer on thick enough that it won't dry too quickly so that you have time to work with it.

Lay your stencil over your painted area.

Take a moist (not too wet!) baby wipe, and wipe vigorously at the areas of exposed paint, removing it from the gessoed background.


This is my 4 year old Brennan clowning around in a tree - he was so proud of himself for being up there like the big kids!
A couple closeups:


I had the pleasure of attending several workshops with Dina Wakely last weekend, and she shared an inspired technique she uses in her art journaling to get the most out of her masks. I couldn't wait to try it on a layout!
I love this mask from the Crafter's Workshop, but I haven't been able to figure out how to use it on a layout - until now.

Start by priming your paper with Gesso. You just need a thin layer - I scraped mine on with a card. Let it dry.

Trace the edge of your stencil so you know how far to paint.

You can use any acrylic paint - I chose to use one of my new Distress Paints - I love how fluid they are. I poured it out and painted it on with a paintbrush.

You want to lay this layer on thick enough that it won't dry too quickly so that you have time to work with it.

Lay your stencil over your painted area.

Take a moist (not too wet!) baby wipe, and wipe vigorously at the areas of exposed paint, removing it from the gessoed background.

Peel away your stencil and voila - you have the negative impression of your mask!

And here is my completed layout - I ended up rotating my background. Do you see the reverse masking with the mini brick wall stencil?

This is my 4 year old Brennan clowning around in a tree - he was so proud of himself for being up there like the big kids!
A couple closeups:


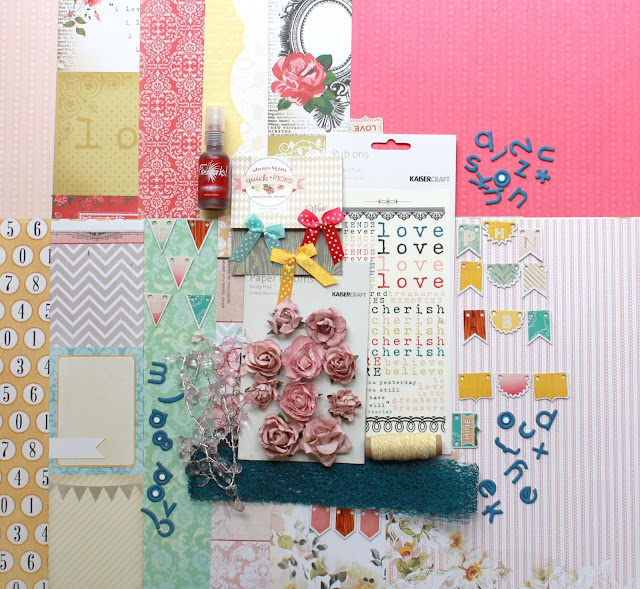
Additional Supplies
Most supplies are from the April 2013 Kit of the Month, which is sold out, but you can buy them separately in the Flying Unicorn Store:
- Prima Lifetime Dolce paper
- Prima Lifetime Journaling Spot Stickers
- Prima Lifetime Wood Buttons
- Prima Lifetime Paper Flowers
- Prima Lifetime Wire Paper Flowers
- Prima Engraver Fabric Vine
- Petaloo Party Stick Ons Small Peony Copper
- Petaloo Premier Penny Lane Ruffled Roses
- Lindy's Stamp Gang Ruby Red Slippers (from the Wizard of Oz set)
- Tattered Angels Glimmer Glam - Be Positive
- Bo Bunny C'Est La Vie Ephemera paper
Monday, June 17, 2013
Cabin In The Woods - New 13 Arts at the Flying Unicorn
The new 13 Arts line Faces of Spring is now available in the Flying Unicorn Store. These gorgeous papers just scream spring and summer and spending time outside. 13 Arts' current challenge is to create a project that incorporates the theme of a house, uses at least one recycled material, 2 types of media and a stamp or transfer, and I couldn't wait to jump in and play and here is what I came up with:

This is my in-laws' gorgeous, rustic summer cabin where I have spent at least a couple of weeks each summer since Evan and I were 16 years old. It truly is our happy place.
I started with Spring Morning for my background and did some masking with my new standby, the Prima Static mask and molding paste. I misted over this then added some additional definition to the raised areas by swiping them with a Turquoise Stone Chalk Edger. I also flicked some of my new Ayeeda Water Ink in Brown over the background. The layers are all cut from the Only For Girls paper.


Another must-have for me right now are Flying Unicorn Metal Adornments. I dry embossed this one, then inked the edges with a Chalk Edger.


This is my in-laws' gorgeous, rustic summer cabin where I have spent at least a couple of weeks each summer since Evan and I were 16 years old. It truly is our happy place.
I started with Spring Morning for my background and did some masking with my new standby, the Prima Static mask and molding paste. I misted over this then added some additional definition to the raised areas by swiping them with a Turquoise Stone Chalk Edger. I also flicked some of my new Ayeeda Water Ink in Brown over the background. The layers are all cut from the Only For Girls paper.

I wanted my chicken wire masking to be shadowed, so I started out by inking over the stencil with Black Coal Chalk Edger and once that was good and dry I offset the mask slightly and went over it again with white gesso.

To satisfy the stamping portion of the challenge, all of my chippies have been stamped with script stamps. These Prima Wooden Icon Houses and Buildings were first covered in Stampendous Aged Embossing Enamel in Ivory before being stamped and having their edges inked.

I used corrugated cardboard for my recycled element, you can see it sticking out above the adorable little Maya Road Canvas Banners (they were included in the Embellishment Add-On of the June KOM and I've used them on everything - I just ordered another 2 packs last night!)

Another must-have for me right now are Flying Unicorn Metal Adornments. I dry embossed this one, then inked the edges with a Chalk Edger.

I used a couple Prima Engraver floral vines to give my photo something to rest on, and distressed all around the photo with a wire brush to give it a weathered look.
If you've picked up your 13 Arts Papers and Media be sure to give this challenge a go - it closes on the 23rd and there is a fantastic prize up for grabs.
Thank you for stopping by!
The End Of Google Reader - Are You Following Your Favorite Blogs on Bloglovin' yet?
Are you following me on Bloglovin' yet? As you may have heard, Google Reader is being phased out on July 1st, which means that for those of us who use Google Reader to review the blogs we follow for new content we need to find another platform. Enter Bloglovin'. Not only do they provide similar features to Google Reader, they have actually improved on the format and e-mail you a daily recap of the blogs you follow including a clickable thumbnail picture. I've made the switch and am loving it. Bloglovin' has an easy transfer system set up which will allow you to effortlessly continue following the blogs you're currently following on Google Reader. I hope you'll make the switch, and would love it if you would follow me over there.
Sunday, June 16, 2013
"Seaside" Canvas Wall Hanging
The June Mid Month Muse Mixed Media Kit from Flying Unicorn contains a fantastic (big!) canvas banner from Canvas Corp. I was a bit intimidated by the size of it, so I began by cutting it into three smaller banners and hemming them into their own wall hangings (I had to make DH look away so he wouldn't discover I DO know how to stitch fabric, not just paper LOL).
Here is the first one I completed, for our room at my in-laws' summer cabin on the ocean:


I loved the way these blue Prima SIIC swirls imitated waves, but they were too bright for the project. A little touch of gesso dulled them up a bit and helped them blend with the rest of the elements.
If you haven't had a chance to pick up your Mid Month Muse Mixed Media Kit, the last I heard there were less than 10 left, so don't delay!
Additional Supplies
Kaisercraft Flowers
Prima Encore Ivory
Lindy's Stamp Gang Bells of Ireland Green
Lindy's Stamp Gang Azure Sea Asters
Lindy's Stamp Gang Whale Watch Blue from Nantucket Pearls set
Petaloo Canterbury Spray Green
Prima SIIC Swirls
Prima bird resin
Doodlebug little green flowers
The End Of Google Reader - Are You Following Your Favorite Blogs on Bloglovin' yet?
Are you following me on Bloglovin' yet? As you may have heard, Google Reader is being phased out on July 1st, which means that for those of us who use Google Reader to review the blogs we follow for new content we need to find another platform. Enter Bloglovin'. Not only do they provide similar features to Google Reader, they have actually improved on the format and e-mail you a daily recap of the blogs you follow including a clickable thumbnail picture. I've made the switch and am loving it. Bloglovin' has an easy transfer system set up which will allow you to effortlessly continue following the blogs you're currently following on Google Reader. I hope you'll make the switch, and would love it if you would follow me over there.
Here is the first one I completed, for our room at my in-laws' summer cabin on the ocean:

I started by finishing the canvas roughly with gesso, leaving some bits of raw canvas showing through for a more weathered, natural look, then started building up my layers. For the sandy bottom portion, I began by layering crumpled kraft-colored tissue paper with Ceramic Stucco and gesso, then finished it off with Stampendous Fran-tage Shabby Beige Fragments. To build the illusion of rocks coming up from the sandy bottom I applied molding paste through a Crafter's Workshop Cell Theory mask and spritzed it with the grey Mister Huey's mist from the kit. Above that I used the 12X12 Prima Static Mask and assorted Lindy's Stamp Gang mists.
The Prima Hello Pastel Fabric Flowers started out grey which did not work with the project, so I painted them with the Lumiere 3D paint from the May KOM. Notice the glass pebbles? They were clear to start, but I colored them with Alcohol Inks in Silver Metallic and Stonewashed to give them a beach glass look.

There is a fantastic burlap flower included in the kit that I wanted to use as the centerpiece for my cluster. I did some additional fraying of the edges, and spread the strands throughout the cluster, then dabbed on several Distress Paints, Craf-T Rub-Ons from the kit and Gesso until I had the weathered look I was going for. I also applied Distress Paint in Broken China, Mowed Lawn and Salty Ocean behind my cluster and misted heavily with water and let it run down across all my textured layers.

In addition to tucking seashells into the cluster, I used one for the center of my flower, finished off with a glass pebble treated with Alcohol Ink and some loose bling.
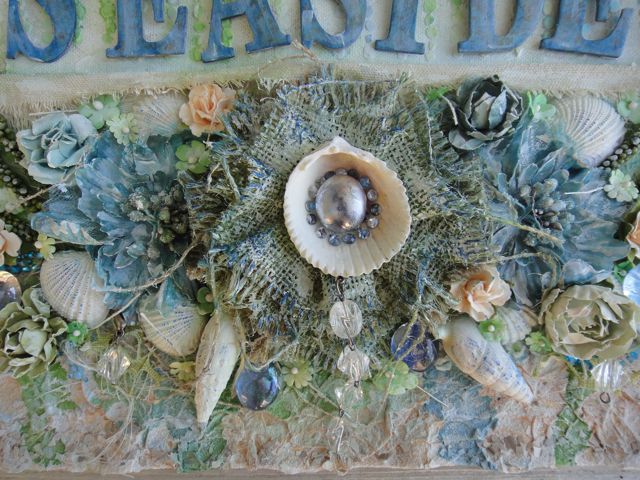
The letters also got a treatment with Distress Paints, Craf-T Rub-Ons and Gesso.

I loved the way these blue Prima SIIC swirls imitated waves, but they were too bright for the project. A little touch of gesso dulled them up a bit and helped them blend with the rest of the elements.
If you haven't had a chance to pick up your Mid Month Muse Mixed Media Kit, the last I heard there were less than 10 left, so don't delay!
Additional Supplies
Kaisercraft Flowers
Prima Encore Ivory
Lindy's Stamp Gang Bells of Ireland Green
Lindy's Stamp Gang Azure Sea Asters
Lindy's Stamp Gang Whale Watch Blue from Nantucket Pearls set
Petaloo Canterbury Spray Green
Prima SIIC Swirls
Prima bird resin
Doodlebug little green flowers
The End Of Google Reader - Are You Following Your Favorite Blogs on Bloglovin' yet?
Are you following me on Bloglovin' yet? As you may have heard, Google Reader is being phased out on July 1st, which means that for those of us who use Google Reader to review the blogs we follow for new content we need to find another platform. Enter Bloglovin'. Not only do they provide similar features to Google Reader, they have actually improved on the format and e-mail you a daily recap of the blogs you follow including a clickable thumbnail picture. I've made the switch and am loving it. Bloglovin' has an easy transfer system set up which will allow you to effortlessly continue following the blogs you're currently following on Google Reader. I hope you'll make the switch, and would love it if you would follow me over there.
Friday, June 14, 2013
Flying Unicorn Mid-Month Muse - Mixed Media Inspired Kit


On the 15th of each month we will make available a collection of paper crafting supplies that will be sure to inspire projects or add to projects that you are or will be creating. Flying Unicorn is looking for you to have fun experimenting and combining various materials for creating art. The items that are chosen will help you discover new styles and techniques. Unleash your passion and lets get creative !
Our creative team let their imagination soar and without further ado their creations :


Subscribe to:
Posts (Atom)