Monday, October 31, 2016

More Than Words October Challenge

Happy Halloween everyone! I'm playing along with the More Than Words October Challenge. This month's word is "Change", and the "more" part of the challenge is "Ombre".


When looking through my stack of photos to choose one for this project, I came upon this picture of two of my boys running into the Aegean sea, and the Jimmy Buffett song "Changes in Latitudes, Changes in Attitudes" sprang into my head; I knew I had my photo!


I created an ombre effect on several parts of my layout, with some turning out more dramatic than others. I extended both the green, blue and sand colours out from my photo using various Shimmerz watercolour paints, tapering the blue and gold out to a translucent edge for a subtle ombre effect.


For the bubbles I wanted a more dramatic ombre effect. I started by stamping the bubbles with a Prima stamp, then added three colours of Gelatos inside each one for a tapering of colour before finishing them off with some dry-brushed gesso. I added splatters to the background using Shimmerz Inklingz; I love to use dry watercolour pucks for this as I can add less water for more textural drops that aren't lost in the background colours. The Webster's Pages sequins added just the right sparkle and visual interest to keep things from being too two dimensional.


The Blue Fern Studios Swirlydoodle chippy was painted with white gesso topped with gold Shimmerz paint and chunky glitter; to help it stand out and to echo the outlines of the bubbles, I outlined it using a black Stamper's Big Brush pen.


I splattered the white Prima Winthrop vines with the same colours I used on the background and added some white gesso to the leaves to help integrate them with the rest of the page. The chippy star is painted with Prima Metallique paint in Ancient coin. To achieve a sandy look under the cluster, I added Ceramic Stucco to the page, and coloured it with some Color Bloom spray before pressing green and blue glass microbeads into the wet medium. I glued the shells in once everything was dry.


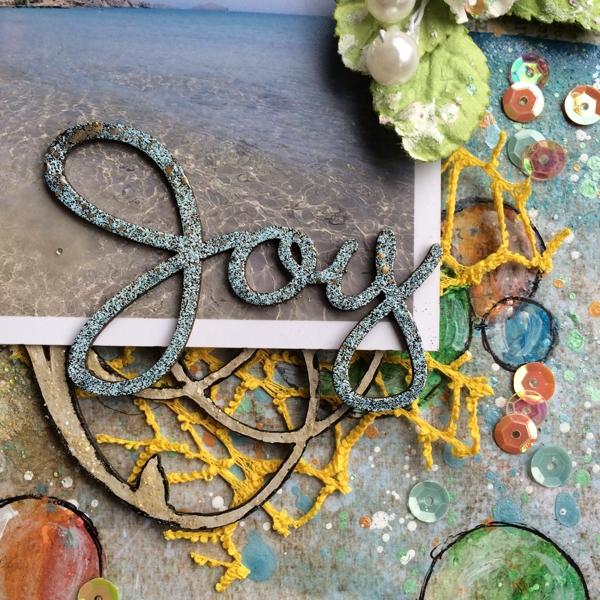
For a pop of colour, I used some yellow mesh trim upcycled from the wrapper of a Costco bouquet, and finished everything off with the "Joy" chippy coated in Aged Aqua Embossing Enamel, as the sentiment sums up pretty well the emotion my boys were feeling frolicking in the Aegean.

Here is the graphic for the More Than Words challenge (click on the graphic to be directed to the challenge post):
http://morethanwordschallenge.blogspot.ca/2016/10/october-2016-main-challenge-change-ombre.html

Thank you for stopping by today!

Products Used:

Blue Fern Studios Serendipity: Contemplation
Blue Fern Studios Chipboard: Swirlydoodle, Seaside Seashells, Good Vibes
Prima Métallique: Ancient Coin
Prima Flowers: Winthrop Vine - White
Webster's Pages: Party Time Sequins
Faber-Castell Gelatos
Prima Stamps: Don't Forget to Fly
Super Heavy Gesso
Prima Micro Beads: Splash, Grass
Prima Color Bloom: Tea Stain
Shimmerz Inklingz: French Twist, Giddy About Green, Me & Blue
Shimmerz Texturez: Artie-Choked
Shimmerz Blingz: Gold Glimmer
Shimmerz Shimmerz: Butter Cream, Tickle Me Turquoise, Sky Blue
Fancy Pants: Memories Captured Alphas
Stampendous: Aged Aqua Embossing Enamel
13 Arts: Splash Ink - White
Ceramic Stucco

Friday, October 21, 2016

Birthday Card - Throwback to My Creative Scrapbook September LE kit

Today's post is a throwback to last month's My Creative Scrapbook Limited Edition kit. I love the Prima Rossi Belle collection, with its amazingly fussy-cuttable pages and versatile chipboard bits, and I love how well the collection paired with Prima Rust paste for a weather-beaten look. I revisited the combination for a birthday card for my great-aunt, who is turning 65.


Some closeups: 

I started with some stenciling with super heavy gesso, then went back in with some blue paint, rust pastes and finally with some gold spray from the kit.


I love all the fussy-cuttable elements in this collection; here I outlined my fussy cut piece with a black india ink pen to give it definition and to help separate it from the images on the background paper.


 Thanks for stopping by today!

Thursday, October 20, 2016

My Creative Scrapbook Sketch Challenge and Video Tutorial

The October Sketch challenge for My Creative Scrapbook is live! This month I have used the sketch as inspiration for one of my projects with the Limited Edition kit, and have prepared a start-to-finish tutorial on on how I put the page together.

 
I've been hanging onto this photo of my youngest, Colby, blowing a dandelion for awhile now, waiting for the right project, and all the flowers from the 49 and Market Heirloom Botanicals collection just begged to be fussy cut, so it was a match made in crafty heaven.

Here is the start to finish video if you want to see my process:


And here is this month's sketch:


And a couple of closeups:


Thank you for stopping by today! 


Wednesday, October 19, 2016

BFS October Challenge

Although I enjoy all of the challenges Blue Fern Studios comes out with on a monthly basis, I have to admit that the sketch challenge is still my favourite. So this month I couldn't resist playing along with the October Sketch Challenge.


I had used this paper from the Sanctuary collection to scrape off one of my stencils covered with black gesso that I had used for another background, knowing it would be a great jumping off point for a layout down the road.


I then continued to build the background, adding heat embossing, Gelatos and mist to the mix, along with layers of paper and some tulle.


I primed the Printer's Bits chipboard with some taupe acrylic paint, and sprinkled on some chunky glitter while it was still wet. I then stamped the piece and splattered on some gold mist, before placing the "F" negative back into the piece (I painted it with blue mist).


I painted "The Story" piece from the Arrow Words set with the same taupe paint and glitter on the arrow itself, and with the blue mist with chunky glitter added to it for the words.


 I completed the layout with some gorgeous neutral blooms, metal pieces and a little bit of bling.

Here's the October sketch I based the layout on:


There's still plenty of time to play along with the sketch. And if you haven't noticed, Blue Fern Studios is having a Design Team Call which closes at the end of the month. They are a fantastic company, with amazing products and provide very generous compensation in products and I thoroughly enjoyed my year on their DT. If you love all things Blue Fern, as I do, I sincerely recommend you submit an application.

Supplies Used

Blue Fern Studios
- Sanctuary collection: Birdsong Melody, Meadows of Time
- Serendipity collection: Chronicle, Imagination
- Chipboard: Printer's Bits, Arrow Words

Additional Supplies
- Andy Skinner stencil: Industrial Elements
- Black Gesso
- Adirondack Dabber: Lake Mist
- Distress Glitter: Clear Rock Candy
- Kaisercraft stamps: Journal, Alphabet
- Ranger Embossing Dabber
- Stampendous Aged Embossing Enamel: Aged Ivory
- Archival Ink: Jet Black
- Prima Color Bloom: Cobalt, Tea Stain, Summer Sky, Worn Leather
- Heidi Swapp Color Shine: Gold
- Faber-Castell Gelatos
- Prima SIIC: Timeless Memories
- Prima Tiny Junkyard Findings: Jeans Buttons
- Prima Brads: Cartographer
- Prima Sunrise Sunset Vintage Trinkets: Mini Numbers

Friday, October 14, 2016

My Creative Scrapbook Altered Birdcage

Hello Bloggers! I'm hunkered down in the midst of what is forecasted to be 5 straight days of storms, listening to the wind and rain lash the windows, enjoying some green tea and popcorn (yum!), so it's a great time to catch up on some blogging.

Today I'm sharing an altered piece using the October My Creative Scrapbook Limited Edition kit.

I started by altering the Prima frame from the kit with various metallic paints followed by some gesso, and trimmed it with the gold braid from the kit around the base, and a bow of the orange ribbon also included in the kit. The little rose on top was taken from the pearl flourish included in the kit, which I used on two other projects. The wood plank "Conservatory" paper was the perfect background, while I used one of the Madeline papers for the base.


I've mentioned before how much I love the fussy-cuttable elements from the 49 and Market papers, and I made good use of them on this project, cutting flowers, the clock and the twigs from the collection and layering them with Prima flowers from the kit.


I also trimmed the fussy cut clock with some of the gold trim.


I altered the Prima resin frame (love these - they are a perennial favourite of mine). I painted it with two Prima Metallique paints, brushing them off the raised portions when they were partially dried. I then rubbed some gold metallic foil over the frame over the raised areas for a gilded effect.


 Thank you for stopping by today! Have a wonderful weekend.


Thursday, October 6, 2016

Harvest Time

I'm back today with a second layout using the My Creative Scrapbook October Limited Edition kit. The purple-y tones of the papers in this kit were perfect for one of the pictures I took on our trip to Napa and Sonoma this summer of some juicy wine grapes hanging on the vine.


I started by adding some media to the background paper - stencilling through an old Prima stencil in my stash with super heavy gesso and adding splatters of mist mixed with some gel medium to give it a bit of body so it would sit atop the page rather than sinking into it.


The kit contains a gorgeous Prima pearl flourish. I began by cutting it apart (reserving half of it for another project), then painted the pearls green using acrylic paint to better match my layout.


The kit contains many elements perfect for layering. I cut apart one of the doilies from the kit, distressing it with some Distress Ink, and added it to my layers of paper, trim, fussy cut elements and flowers.


Thank you for stopping by today. Be sure to check out the My Creative Scrapbook blog for more inspiration from the Design Team, and the website to check out all four of this month's gorgeous kits.


Wednesday, October 5, 2016

My Creative Scrapbook October Limited Edition Kit Reveal

It's kit reveal day at My Creative Scrapbook, and I have the good fortune of guest designing for them again this month, using the beautiful and fun Limited Edition kit. This month's kit features papers from 49 & Market and Bo Bunny, and has amazing potential for fussy cutting.

For my first layout I wanted to build on the natural elements in this photo of my three sons and I, as well as to incorporate some references to time passing. I can't believe it's already been 2 years since we had these photos taken!


Here's a look at the gorgeous Limited Edition kit this month:

www.mycreativescrapbook.com

I started my background using the stencil from the kit and some Spun Sugar Shimmerz Dazzlerz, over which I layered blue embossing powder (which I did not heat set) and fine silver glitter while it was still wet.
 

The peek-a-boos created by tearing the background paper made great places to nestle fussy cut images from some of the other pages.


To give the fussy cut butterflies some additional dimension I folded the wings and adhered them on top of the rolled edges with hot glue.


The elements of this kit layered so well together!


I used a couple of the stickers from the Bo Bunny sticker sheet included in the kit to create a signpost above my birdhouse.


Thank you for stopping by today! Be sure to visit the My Creative Scrapbook blog for inspiration from the rest of the design team, and the website to view the other three October kits and for information on becoming a member of the Club!