Have you seen the new Tim Holtz Distress Paints from Ranger? They've just arrived in the Flying Unicorn store, and I couldn't wait to get my hands on them and try them out, so this week's WCYDW is all about Distress Paints.
Distress Paints are a liquid acrylic paint; they are runnier than most acrylics and are reactive to water while still wet. I treated some Prima Resist Canvas Shapes with Distress Stains (left) and with Distress Paints (right) - you can see that the Distress Stains give a translucent coverage while the Distres Paints give an opaque coverage. The resist images are still visible on the painted canvas, you just have to rub off the paint while it is still wet to expose the resist - once it is dry it is set.
Here is a closer look at the difference between the two. The colors used on the pieces are the same, Broken China and Antiqued Bronze; you can see what a dramatic difference there is between the Stains and the Paints.
In the course of playing around I also discovered that if you hold your heat gun close to the piece while it dries the paint will bubble; with the Antiqued Bronze you get the illusion of rusted metal.

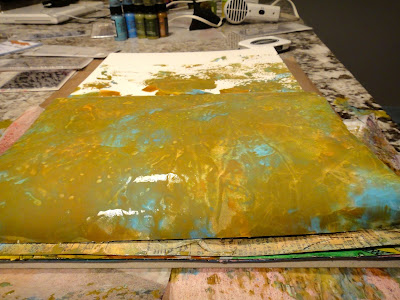
I initially tried applying the Distress Paints to Saran Wrap and stamping with that, however because Saran is so flimsy all the paint tended to pool in the center when I lifted it up. The 12.5 x 12.5" plastic sleeves that my Flying Unicorn kits come in are a perfect size and gave me a sturdier plastic to work with. (If you look closely you can see the plastic sleeve is sitting on top of my craft mat).
Start by applying pools of color onto your plastic.
Mist with water - this will make the colors wick into one another.
Pick up your plastic and place it face-down on your page. I focused just on coating the left-hand page to start.
You can see that despite the fact that I've used the plastic to stamps all over the page, the colors have not become muddied, but have layered in such a way that each color is distinct.
Press the two pages together, and use your plastic to fill in whatever little white spaces are left.
Misting with water allows the colors to blend further.
You can dry as is; I blotted off some of the paint to create a more mottled texture, then dried. Once the Distress Paint is dry, it will not rewet, so subsequent layers of paint that you apply on top will remain distinct.

Here is what the finished pages looked like - you can see distinct areas of blue, green and bronze - how cool is that!
This is another background I had worked on previously to try the technique out. Once it was dry I applied Tim Holtz Tissue Tape and drywall tape, and colored it all with Distress Stain. Because the Distress Paint does not rewet the Distress Stain can be applied overtop without experiencing any running or change in color.
Distress Paint also dries flat and smooth, so stamping overtop is a breeze. Here I've stamped in archival ink so that I can apply more layers of Distress Paint and water without worrying about my stamping running.
You can stamp with Distress Paint, but beware, you want to clean it off you stamp immediately once you are done. If it dries it will be permanent, which makes it great for treating materials other than papers, such as metal and plastic.
Once I'd stamped with Broken China and Salty Ocean it was time to add more water...
And let the paint drip down the page.
And here is the finished journal page:
I've just scratched the surface as far as Distress Paints are concerned, but I can't wait to expand my collection (there are currently 27 of the Distress color palette available, including the 3 metallic colors) and to play some more! I see some painted Flying Unicorn Metal Adornments in my future. And layouts. And...


