Sunday, August 25, 2013

Never Broken - Flying Unicorn Mojo Monday

One of my favorite, if not my very favorite, releases at summer CHA was FabScraps' Wild At Heart collection, now available in the Flying Unicorn Store. It is my turn to provide the inspiration for the Mojo Monday sketch in the Flying Unicorn Forums, and though the sketch Alda designed is soft and dreamy, I couldn't resist the urge to play with my new FabScraps papers and build on their grungy goodness.


This is a picture of my second son, Brennan, at about 2 1/2 years old.  It seemed like that entire summer Brennan was banged up - I lost count of the number of bumps, bruises, black eyes, cuts and scrapes the poor little guy received trying to keep up to his big brother and cousin.  But through it all he maintained a fighting spirit, jumping up and dusting himself off, earning him the nickname "Tough Guy".

The challenge on the Shimmerz Paints blog this month is to add texture to your page, so I set out to create a layout as gritty as my little man.


I started by applying Texturez in Teal Me No Lies through a stencil, and to add more texture, I stamped into the wet paint with a Kaisercraft Number stamp and then stamped randomly on the page.  The white stamped circles are made using Picket Fence Distress Paint applied directly to the stamp - it gives a more ghostlike effect than gesso.


The dark alphas got lost on the page, but outlining them in White Sharpie Poster Pen really makes them pop.  I cut some hearts out of corrugated cardboard, inked them with some Prima Chalk Ink and wrapped them in jute twine.


Lots of FabScraps goodies here, including chipboard gears, tags and envelopes.  And a little gessoed bubble wrap - thanks Shona for the brilliant idea!

Here is the beautiful Mojo Monday sketch for this week:


Play along with us this week to win a $10 gift certificate to the Flying Unicorn Store.

The rules :

01. You have one week to create your project using the sketch as inspiration ( it does not have to be a layout it can be a card, a tag etc )
02. You must post your creation in this thread in order to be eligible for the 10.00 GC
03. You may use your project for any other monthly forum challenges except for the Anything goes challenge
04. Your project must be posted no later than 8:00pm on Sunday, September 1st, 2013.
05. All other standard rules apply .


New FabScraps Wild At Heart at the Flying Unicorn

FabScraps summer CHA release Wild At Heart is now available in the Flying Unicorn Store.  This collection is a beautiful mix of blues, reds and browns with more manly motifs than many other FabScraps lines - gears, surfing, biking, skateboarding and music.

For this layout I've used some of the more beachy papers from the collection, along with a photo of Evan, Elliot and Brennan I've scrapped before - there's just something about pictures of dads holding their little sons' hands that melts my heart :)


I added a harlequin pattern to my base paper using two different colors of blue chalk ink and some gel medium to echo the harlequin pattern on some of the papers.


To add a pop of yellow I used some of the Fancy Pants corrugated cardstock from the August Embellishment Add-On.


I cut the ScrapFx trident chippy in half to stretch it out beneath my cluster and colored it using gesso and Lindy's spray in Bachelor Button Blue.


I touched everything with gesso to tie it all together.


Thanks for stopping by! I'll have another Wild At Heart layout to share on Monday.

Supplies:

- FabScraps Wild At Heart: Wild Tunes 2, Wild Ride 1, Wild Tunes 1, Surfing Wild 2, Wild Ride 2
- ScrapFx chippy
- Petaloo flowers (white)
- Manor House flowers (blue)
- Prima Encore flowers
- Doodlebug twine
- Crafter's Workshop Mini Harlequin Mask 6x6
- Prima Static Mask 12x12
- Prima canvas shapes
- Lindy's Stamp Gang Mists
- Donna Salazar bubble wrap stamp
- Gesso
- Gel Medium
- Molding Paste
- Colorbox Chalk Inks


Thursday, August 15, 2013

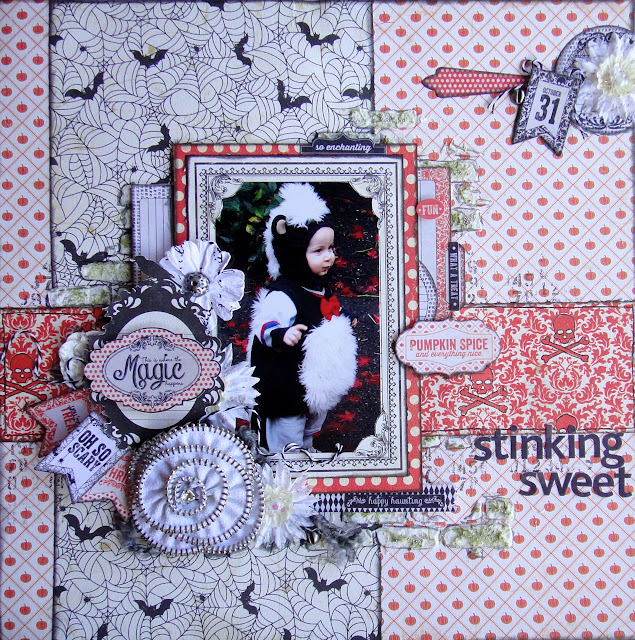
Stinking Sweet - Authentique's New Releases Now In Stock At Flying Unicorn!

Authentique's new releases from summer CHA are now in stock at the Flying Unicorn Store!  I had the opportunity to meet some of the Authentique crew at CHA, and let me tell you, they were some of the most personable, accommodating, genuine people there.

Their new Halloween release, Thrilling, is everything you could hope for in a Halloween line; it combines cute vintage Halloween cutouts with funky modern graphics (the orange skull and crossbones damask piece is possibly my favorite Halloween paper ever).

This is a picture of my eldest, Elliot, when he was about 14 months old (I can't believe my little man is going to be 7 tomorrow!) - isn't he just too sweet?


I did a little bit of background work to start, building some bricks out of light molding paste.  While it was still wet I dabbed it with a sea sponge to create texture, then applied some green Texturez and silver microbeads and outlined it in black ink to give it an oozy, Halloweeny feel.  I added in a little stamping and then began building my paper layers.


The sticker sheet for this collection is amazing, with so many fantastic images for layering.  In order to be able to move them around until I was happy with them, I used Creative Team member Lynne's tip of coating the backs of my stickers with baby powder and it worked like a charm - you wouldn't even be able to tell they are stickers to the touch.


Can you see the amazing texture of these papers?  They feel fantastic in your hands - they have great weight and texture pressed right into them, like a good weight watercolor paper.


Love these little banner pieces and the way everything is just made for layering.


 Supplies

Authentique Thrilling - Papers: Mystic, Forewarn, Antidote, Superstition; Sticker Sheets: Elements and Detail
- Crafter's Workshop Mini Brick Stencil
- Light Molding Paste
- Shimmerz Texturez Arti-Choked
- Pop! Microbeads Silver
- 13 Arts Ayeeda Water Ink Black
- Prima Leeza Gibbons flowers
- Prima Sunrise Sunset zipper flowers
- twine and yarn
- Prima Tiny Junkyard Findings
- Pink Paislee flower

Thanks for stopping by!


Wednesday, August 14, 2013

Flying Unicorn August Mid-Month Muse Kit Available Now!

The Flying Unicorn's August Mid-Month Muse Mixed Media Inspired kit is on sale now!

From Canvases, Compressed Chalk, Rubbing Plates to Paintsticks this monthly mixed media kit will get you creating with new mediums that you may have never used before. So without further ado we introduce our Mid Month Muse, Mixed Media Inspired Kit .


Roll up your sleeves, get your hands a little messy and get creative with our Mixed Media Kit!
Here is a little inspiration form our Creative Team using the August Mid Month Muse Kit


Our kits our exclusive to the Flying Unicorn Store, and they are sold on a first come first serve basis - we have no sign ups, creativity should be a passion not an obligation but when the kits are sold out they are gone - so do not delay and get your kit today !

Saturday, August 10, 2013

Wednesday, August 7, 2013

Mission Impossible: Flying Unicorn - Mission Accomplished

In August the Flying Unicorn Forums gets turned on its head as the members take the reins.  All challenges this month are member hosted, including the dreaded Mission Impossible challenge, back for its second year.

The CT's mission, whether or not we choose to accept it, is to create a layout from a fugly package lovingly (or is that maliciously?) compiled and sent to us by one of the members.  And unfortunately this package does not self-destruct in 5 seconds.

The lovely Linda Pekrul sent me this mess:


The rules:

- use at least 4X4 of each of the papers
- use both ribbons
- use at least 4 of the embellishments (but failure to use all of the embellies would result in ridicule)

But wait, they couldn't make it too easy...

- must use at least 3" of duct tape - color of my choice
- something from your bathroom
- cannot use any mediums, though paint and ink are permitted

AND they chose the pictures for us.  We could choose one of these three pictures:


Lucky us, we were allowed to color adjust or otherwise Photoshop the photo (can you feel the sarcasm).

After a lot of whinging and complaining, I turned in this:


All I can say is thank goodness for my black Gelato!!!

Lucky for me, the really busy blue paper covered with road signs (second from the right in the picture of the package contents) had a "nice(r)" B-side which I could use for my background, and the paper with the little monsters had colored blocks with squiggly black lines that looked like fingerprints.

The picture pretty much dictated which way this layout was going, so I opted for a Gothic, Edgar Allan Poe inspired layout.  The "Forever" glittered chipboard embellie was cut down to read "Never" and I added a handwritten more, then added a raven from the Tim Holtz Halloween Blueprint 2 stamp set, colored with black Gelato and Squeezed Lemonade Distress Marker.


Luckily I had gauze in my boys' bathroom, which I used to make a nest for the raven along with some of the beaded trim Linda sent me (is it just magpies who like shiny things, or do ravens, too?).


Much to my delight, both ribbons took Staz-On Ink.  You can see the (formerly) yellow ribbon below - added bonus, the flowers on the ribbon acted as a resist!


There were three canvas circles included in the set, one large and two small.  I stamped them with the skull and crossbones from the label of the Poison blueprint stamps from the Halloween Blueprint 2 and Mini Blueprints 5 and colored the skull and crossbones in with Picket Fence Distress Paint. I trimmed the corrugated cardboard X into crossbones which I painted and mounted behind the big circle.


And the duct tape?  My father-in-law happened to have a roll of olive green duct tape (when I asked Evan for duct tape I got a rant about why he doesn't own it and why I shouldn't buy any either, LOL - which boils down to it doesn't stick to what it is supposed to, sticks to what it shouldn't, and if you do ever get it to stick to anything in 6 months it crumbles off but leaves one heck of a residue).  I not only used it to mat my photo, but I also discovered that I could stamp on it using Distress Paint, and I then fussy cut it out to make a focal embellie.


 Glad that challenge is over for another year, and the members don't want to know what I have brewing for my revenge in my September challenge Muahahahaha!  But I do have to say, I am really happy with the way this turned out, and it did challenge me to think hard about how I was going to pull it off and what's life without a challenge.

If you'd like to check out the rest of the Creative Team's Mission Impossible challenges, you can do so HERE.

Sunday, August 4, 2013

Play In The Sunshine - Part 2 {Flying Unicorn}

I'm posting while on vacation at my in-laws' rustic cabin in the woods - thank goodness for solar power and mobile tethering!  I have been scrapping on the wraparound deck 20 feet from the ocean by day and under lantern and candlelight at night (which makes color checking a bit challenging!) during those rare moments when the kids are happily occupied elsewhere.

Since Colby and I are up at 6:30 while the rest of the house is still asleep, I'm taking the opportunity to type up a post with two other projects created with the August Flying Unicorn kit of the month Play In The Sunshine.  There are less than 5 kits left, so hurry and get yours before it's gone.

This series of pictures of my middle son Brennan kicking a soccer ball into our friends' pool have been calling out to me to be used for the past 2 years.

I used Shona's Kroma Crackle BAP tutorial - if you've ever worked with Kroma Crackle you know it takes ages to dry; this technique cuts the drying time down considerably.  I started by misting my background with some contrasting Lindy's Stamp Gang colors, and mixed Broken China Distress Paint into the Kroma - a little goes a long way (5% acrylic paint to 95% Kroma) and the color doesn't dilute - before applying it to my page.  I laid it on thick to get the nice big cracks.


For some additional texture I used Simmerz Texturez in Patina and Teal Me No Lies and overlayed some of the mesh webbing from the kit right into the wet paint.


I also crumpled up the mesh to make dimensional clouds over Brennan's head.


The cute little Flying Unicorn Adornment butterfly was included in last month's Mid-Month Muse kit.


Another closeup of the gorgeous crackle.


Flying Unicorn kits are unique in that they each contain an Off-The-Page project. This month's OTP is a chest of 3 drawers from Kaisercraft. I assembled mine unpainted using Glossy Accents (if you paint it first the joints might swell, making assembly difficult), then primed it with black paint, then used Crackle Medium and off-white paint to get the aged effect I was after.


FabScraps' Classic papers were perfect for this project - love them!


I colored all of my Flying Unicorn Adornments using Black Alcohol Ink to coordinate them with the papers.


Well, all 3 kids are up and looking for breakfast, so it's time for me to sign off.  I hope everyone is enjoying their weekend - it's a long weekend here, hurrah!