Friday, February 28, 2014

Flying Unicorn March KOM - Part 1

Good morning! How is it the last day of February already? It's been a bit of a crazy month around our place; I'm really looking forward to putting February behind me.

Amidst all the chaos, I did have some time to create with the lovely March Flying Unicorn kit of the month. Have you had a chance to check it out yet? Blue, black and white - swoon!

My first project is an elegant little card. The stickers in the Mixed Passion kit are perfect for cards! And the feathers? Perfection.


A couple closeups:


Thanks for stopping by!


Thursday, February 27, 2014

Flying Unicorn March Kit of the Month Reveal


We are so excited to bring you our March 2014 Kit of the Month. We begin with out MAIN KIT and the INCLUDED off the page project

You get the latest and the greatest in the main kit to get your creative mojo flowing and we will always include an off the page project ( OTP) that will inspire and sometimes challenge your inspiration- but always creative fun! Our March kit is filled with creative goodies that will excite

Just take a look at some of the amazing inspirational projects from the creative team :


Welcome to the Mixed Art! Our new add on kit will always come with a canvas and a variety mediums, mists, tools that compliment that main kit.

Here are a few amazing inspirational projects by the Flying Unicorn Creative Team


Our Mixed Passion add on kit if filled with flowers, ribbons, trinkets and more. Jam packed with embellishments that compliment the main kit.


Small Art. Big Passion is exactly what this new add on kit is filled with. Papers that are on a smaller scale that will compliment the main kit and embellishments that are scaled to compliment the main kit or to entice you to create cards, tags, atc's and so much more !


Our educational creativeness explodes this month with amazing creations and tutorials by Shona and Erica !

Join Shona on March 4th, 2014 - In our BAP forums to create and play in our art journal using the kit of the month !

Join Erica on March 6th on our You Tube Channel where she show us a step by step tutorial in creating an amazing layout!


http://www.youtube.com/user/FlyingUnicornStore


As you can see we have filled our March kit and add on Kits with so much creative awesomeness - CLICK HERE - to get yours now - Remember there are no sign ups - they are sold on a first come first serve basis and once they are gone they are gone !

Friday, February 21, 2014

13 Days With 13 Arts

Hello bloggers! I hope you've had a chance to follow along with the 13 Days With 13 Arts promotion between the Flying Unicorn and 13 Arts. If you haven't, it's not too late to start. On alternating days creative team members from Flying Unicorn and 13 Arts are preparing projects and tutorials to inspire you, and each day there is a fantastic RAK up for grabs. Keep reading for all the details on your chance to win.

It's my turn to provide some inspiration today, and I've been playing with 13 Arts' new Timeless collection. I love the colour orange, though I know it can scare some people off, and partnered with blue as it is in this collection? Perfection!

Here I've used it to capture a memory of my two year old, Colby, goofing around at a friend's pool. Because the colours in the photo are pretty neutral, I had free rein to use it with brightly-colored background papers and embellishments.


I knew I wanted to do lots of misting on the background, but found that I did not have the right orange-red colour.

Have you had a chance to play with 13 Arts mists? I love them, and my tutorial for you today is about making your mists work harder for you. How often do you have a project and turn to your mists only to find that you do not have the right colour, or that what you have is too bold? Despite my copious, and growing, mist collection, it happens to me all the time. But there's an easy solution - custom mixing your mists to achieve the colour you're after. You can combine your 13 Arts mists with each other (Pearl and Chalk can be mixed together), and even better, you can drop in some 13 Arts Water Ink (which is transparent) to give you even more possibilities.

To illustrate my point, I prepared a cheat sheet of some of the possible combinations I could make using the Water Inks, Chalk Mists and Pearl Mists I had on hand.

As you can see, some of the combinations are stunning (check out the two greens on the top row) while others were less successful (I didn't manage to get a good purple from the colours I have).


Rather than mix up a whole bunch of mist only to discover it isn't a pleasing combination, I start by mixing a couple of drops on a non-porous surface (your craft mat, for instance, or a palette; in my case I used one of the plastic cutting mats for my Big Shot) and then painting the mixture onto a piece of watercolour paper.


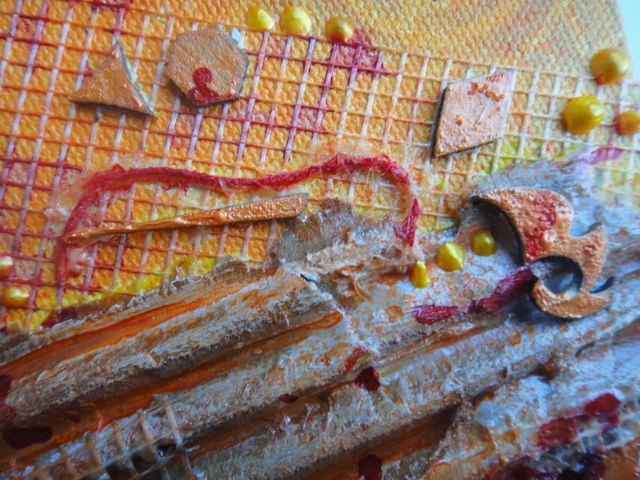
I chose to go with one of the bolder papers for my background, and layered on my background elements - strips of paper from the collection, canvas tape, film strip and mesh tape.


I added some misting using my custom orange-red mist through a stencil, and also stamped randomly on the page with the wet stencil.


Next I added some masking with the fabulous 13 Arts Modeling Paste. The texture of this stuff is amazing, light and whipped. For an added pop of colour I stamped with 13 Arts Water Ink in Scarlet.


I finished everything up by stamping with some of the Burnt Sienna Chalk mist and a mist cap and with flicks of Black Water Ink off a stiff-bristled brush. I also fussy cut some elements from the paper, used a sticker from the collection and created some custom embellishments with punched circles.


Here is today's gorgeous RAK, provided by Aida at 13 Arts (did I mention there is a RAK up for grabs for each of the 13 days?).


To be in the running, head over to the 13 Arts Facebook page. Like them and share the project of the day between 7am and 9pm EST and you will be entered to win.


Products Used:

13 Arts Timeless Collection: Perfect Moment; Remember When; Today, Tomorrow, Always; All The Time & Timeless Sticker Sheet
13 Arts Mists: Burnt Sienna Chalk, Sky Blue Pearl (on the flowers)
13 Arts Water Inks: Scarlet, Yellow, Black
13 Arts Media: Modeling Paste


Wednesday, February 12, 2014

Mixed Media canvas

Hi there! Happy hump day. Just stopping in today with a quick share.

This canvas was inspired by a pair of canvases in the quiet study room of our club, the adults-only haven I retreat to when Brennan is in preschool and Colby is happily playing in childminding and for whatever reason I can't haul myself up to the gym. I love the blends of oranges, reds and textures, and wanted to play around with them at home.

This oval-shaped canvas was included in the Mixed Art add-on to the Flying Unicorn February kit of the month.


The canvas is already primed, so I started by misting it with various mists, then added mesh tape, cardboard, string and the little chipboard bits from some of my Blue Fern Studios chipboard.


I peeled apart a flimsy piece of corrugated cardboard, and painted it roughly with white gesso, then painted over it with gel medium. The gesso and gel blended together to make a really interesting texture and colour - kind of silvery. I painted the Blue Fern chippies with Shimmerz Dimensionz.


I coloured the strings with 13 Arts Water Ink to make them stand out, then added some stencilling with Distress Ink to finish everything off.

Supplies

Dylusions Lemon Zest and Pure Sunshine
Shimmerz Dimensionz Orange Up Pretty
Viva Pearl Pen Sunshine Yellow
Blue Fern Studios Blue Fern Bits
Distress Ink Vintage Photo
Crafters Workshop 6x6 stencil

Tuesday, February 11, 2014

Never A Dull Moment

Hello! Today I'm sharing my third DT project for Blue Fern Studios for February.  For this layout I used up my last full sheet of 7 Dots Wonderland paper (and could have wept - so sad to use up the last bits of your favourites, isn't it?), and I had a lot of fun building up colour and texture on an already colourful and textural background. I love this picture of Brennan, my middle son, and the look of disdain on his face, and wanted to use chipboard to draw the eye in to the photo.


The Graduated Circles were perfect for the task. I started by colouring the piece with a white Gelato, then built up additional colours with Gelatos and finished the whole thing off with random spots of coordinating Lindy's Stamp Gang embossing powders. I would later use the Graduated Circle as a frame for my clusters, which keeps the eyes moving around the centre of the page.


The Tattered Diamond Bits ground the photo within the circle, preventing it from looking as though it is just floating there. I started by heat embossing them with a weathered embossing powder, then added in Gelatos in orange and brown to marry it to my colour scheme.


For the title, I painted it with gesso and my finger, leaving texture behind, then misted it randomly to achieve an ombre effect.


And last but not least, a pop of purple Gelato to coordinate with the purple in the photo.


Products Used

- Never A Dull Moment chipboard
- Graduated Circles chipboard
- Tattered Diamond Bits chipboard
- Seaside Seashells chipboard


Thanks for stopping by!

Monday, February 10, 2014

Heads Up - Blue Fern Gardens paper!

I'm up on the Blue Fern Studios blog today to share my February Design Team projects, including one with the new Blue Fern Garden papers. I was so excited to receive these papers; they are so beautiful I almost couldn't bear to cut into them. Almost. I did get over it, and had a lot of fun in the process.


I love the lattice pattern of the Love Letters paper, and started by cutting it out with an X-acto knife, then used the pattern on the background Signature paper dictate how I trimmed the lattice. I wanted to leave the lovely birdcage and doily in the bottom right and the flowers and flourishes in the top left corners visible.


I glued the lattice down, then applied all my media overtop to make it an organic part of my background. Lots of layers here - misting with 13 Arts and Lindy's Stamp Gang mists, masking with 13 Arts Texture Paste, stamping, and some added texture with Shimmerz Texturez in Patina and Artie-Choked.

Lots of Blue Fern Studios chipboard scattered throughout. Frames are a great way to highlight a focal point on your photo; here I printed a second copy of the photo and fussy cut my youngest son Colby and the swing out of it and adhered it over the frame to bring movement to the picture. Of the three of us in the picture, there is no doubt who is the focal person (even more helpful when the photo is not particularly flattering of my eldest son and I). I started by rubbing a candle on the chipboard to create a bit of a resist, then painted and splattered on various coordinating colours of watercolour paints for a fun, artsy feel.


In addition to the lattice, there are lots of layers of paper and media on my background. I didn't want to cover these completely with additional layers of paper, but did want to add some additional bulk behind the photo; the Shabby Brick Bits were ideal for this purpose, and grounded the photo and cluster while allowing the background to peek through. I simply painted the chipboard with two coats of gesso, then added stamping and splattering.


Your chipboard doesn't always have to be the focal point of your layout. I needed a little something to bulk up my cluster, and this butterfly, painted randomly with watercolours, fit the bill perfectly.


With such a busy background, I wanted to make my title bold and simple to help it really stand out. A simple coat of black watercolour paint did the trick. I mounted the title on top of the flowers in my cluster with some wet adhesive.


Products Used

- Blue Fern Garden Signature paper
- Blue Fern Garden Love Letters paper
- Blue Fern Garden Calling Cards paper
- Shabby Brick Bits chipboard
- Picture Perfect chipboard
- The Optimist Word Set chipboard
- Icons Set One chipboard

Thanks for stopping by today! It's a holiday here for us in BC (Family Day), so we are enjoying an extra family day. I got my first ski day of the year in yesterday, and am hoping to get in a recuperative spa day today ;) It is also my beautiful younger sister's birthday, and if anyone should have a provincial holiday to celebrate her birthday, it's Emily.